Monday, December 30, 2013

Warm Carob Pie

The holidays were good overall.  I loved spending time with family, and felt good overall, definitely a blessing!  However, avoiding all the food was a drag.  I brought my own dish to most of the celebrations which always ensured that there was something I could eat.  My family is supportive, but the IC diet is just not something that is easy to explain.  Additionally, I HATE dictating a menu and requesting that special foods be cooked for me.  My general rule is that I bring something that I love that I can share with others.  It works well, keeps me satisfied, and avoids hurting feelings.  Because of my rule, I did well over the holidays.  However, I was left with a craving for something chocolaty.  You know how that is... So, I started poking around my kitchen and found a pie crust in my fridge leftover from holiday baking and some carob powder in my pantry.  I decided to combine/tweak some recipes from some of my old cookbooks and came up with an amazing carob pie. 

I have to be honest, the word carob never gets me excited.  I usually make a face, my tongue waters in a bad way, and I choose to bake something else to try and satisfy whatever sugary craving I have that day. Tonight, the giant and relatively expensive can of carob was making me feel guilty, and I thought I would give carob yet another try.  I prepared the pie and put it in the oven and then started making some quick vanilla ice cream, because I had a feeling that the I would need to offset the usual bitterness of the carob with some tasty ice cream.  However, to my pleasant surprise, this pie is delicious!  Completely convincing for chocolate, and it definitely didn't need the ice cream.  I'm happy to have found such a suitable chocolate substitute! It's a good night in the kitchen, and my chocolate tooth is definitely satisfied!

Warm Carob Pie

Ingredients:
1 cup sugar
1/2 cup flour
1/2 cup butter, melted
2 tablespoons carob powder
1 teaspoon vanilla
2 eggs, beaten
1 (9-inch) pie shell, unbaked
Directions
Combine and mix sugar, flour, butter, carob, vanilla, and eggs.  Pour into pie shell.  Bake at 350 degrees for 30 minutes.  Let cool for about 10 minutes.  Slice and serve (with completely optional vanilla ice cream)

Wednesday, November 20, 2013

Chicken Broccoli Cheese Casserole

Some days, I do not know what I am thinking with trying to live a normal live and have IC.  I am in grad school for my masters in counseling, and the stress right now is unbearable.  Throw on some family issues/stress, the upcoming holidays, financial tightness (due to me quitting my job), it's no wonder my IC has been acting up so much.  Yesterday I had one of those solid emotional breakdowns after finding out that I do not, in fact, have a UTI, and that all this unceasing pain, despite my usual remedies, is only my IC.  ugh. So, I'll apologize for the lack of updates, but I know you know what it is like!

So after getting home from an awful day, I started poking around in my fridge and pantry.  There was nothing that was totally "safe" yet yummy and comforting.  I did have some rice, some broccoli, and some cheese on hand, so I decided to meander the internet to find some sort of casserole that I could modify to be totally safe and yummy.  I needed something easy; being in the kitchen for more than 30 minutes was simply not happening, so I decided on a recipe from Kristen from Iowa Girl Eats.  It was one of those recipes that didn't even need a whole lot of modifying- the best kind.  I also love that there are no cream of whatever condensed soups involved.  While I've found some Health Valley Soups are usually okay for me, it is reassuring to know that everything in a recipe is TOTALLY safe and on the green friendly foods list.   

Chicken Broccoli Cheese Casserole

Ingredients:
2 cups brown rice
4 cups chicken broth (I make my own)
4 cups broccoli florets (I used frozen because that was what I had)
1 tablespoon olive oil
1 pound chicken breasts, cut into bite-sized pieces
1 teaspoon fresh minced garlic
3 tablespoons flour
2 cups milk, divided
2 cups shredded mild cheddar cheese
1/4 teaspoon salt
1/4 teaspoon garlic powder

Directions
1. Cook rice in chicken broth according to package directions.  In my case, I threw it all in the rice cooker and let it cook there.  Trust me or Kristen from Iowa Girl Eats on this- the rice is so much better cooked in chicken broth instead of water!
2. While rice is finishing cooking and broccoli is steaming, begin cooking the chicken.  Heat olive oil in skillet over medium heat.  Add chicken and garlic.  Cook for 5-7 minutes or until chicken is cooked through/no longer pink inside.  Remove from heat and set aside
3. When rice has about 10 minutes left to cook, steam broccoli in microwave for 5-7 minutes (I used frozen broccoli, if you are using fresh, adjust cooking time accordingly) 
4. In a small bowl, whisk together flour and 1/2 cup milk.  When flour is completely dissolved, pour into medium saucepan along with the remaining 1 and 1/2 cups milk.  Cook over medium heat, stirring constantly, until mixture is thickened, about 5-10 minutes.  Remove from heat and stir in 1 and 1/2 cups shredded cheddar cheese, salt, and garlic powder, stirring until melted.  
5. Preheat oven to broil.
6. Butter 9x13 baking dish.  (I do not use Pam or any similar non-stick spray because of the chemicals.  I simply take about a tablespoon of butter and rub it around in the baking dish so that the dish is completely coated) 
7. In a large bowl, stir together the cooked rice, steamed broccoli, chicken, and cheese mixture.  Pour into prepared 9x13 baking dish. Top with remaining 1/2 cup cheese.
8. Broil in oven until cheese on top starts to brown, about 5 minutes. 

Saturday, October 12, 2013

Carob Peanut Butter Bars

Alright, Halloween is later this month, and the stores are filled with candies and pumpkins.  I love fall. I love pumpkins.  I love many things about this time of year that IC does not interfere with.  However, my least favorite thing about this time of year and Halloween is the re-appearance of stupid seasonal Reese's treats.  We've had a nice long break of these treats not being available.  Really it's only been like 4 months, but, whatever the case, I really enjoy not seeing these things in stores.  Now they will be available again until May.  Don't believe me? Think about it.  It starts with the Halloween pumpkins, then outcome the Christmas trees, then the Valentine's day hearts, and ends with the Easter eggs.  Whhhhyyyyy?! Maybe there is a week break in there, but for me, seeing these things in stores just makes me bitter and annoyed.  I LOVE THEM.  Okay, enough of my moaning and complaining about how unfair and miserable store trips and holiday candies are.  I decided to come up with an IC-safe substitute, a treat that will quench your peanut butter and chocolate craving.

Generally, I am not a huge fan of carob.  I really don't know what it is, but it makes the edges of my tongue water, and it never quenches my desire for chocolate.  However, the glaze I came up with for this recipe is actually awesome.  No tongue watering, except from looking and smelling these bars because they are AMAZING.  Get your peanut butter chocolate fix and try these bars.  You won't regret it.

Carob Peanut Butter Bars

Recipe adapted from Leigh Anne at yourhomebasedmom.com 


Ingredients:
Crust:
1/4 c. butter
3/4 c. sugar
3/4 c. brown sugar
2 eggs
3/4 tsp. baking soda
1/4 tsp. salt
1 1/2 c. all-purpose flour
` `/2 c. quick oats
1 1/2 tsp. vanilla

Peanut Butter Filling:
1 c. all-natural peanut butter (ingredients are just peanuts and oil- nothing else)
1/3 c. sugar
1 tsp. vanilla

Glaze:
1/4 c. butter
1 Tbsp carob powder
3 Tbsp milk
2 c. powdered sugar

Instructions
1. Heat oven to 375 degrees F
2. Cream together butter and sugars. Add in eggs and vanilla and beat until fluffy.
3. In a separate bowl, stir together flour, soda, salt, and oats until combined.
4. Add dry ingredients to wet ingredients and beat until combined.
5. Spread this mixture on large cookie sheet.  (This is easiest if you use your hands and some flour and just pat it all out until it is even and pan is covered.)
6. Bake in preheated oven for 10 minutes
7. Mix together the peanut butter, sugar, and vanilla for the peanut butter filling.  Spread this mixture over warm crust.  Be patient, the natural peanut butter is hard to spread, but it will if you work slowly and patiently
8. Prepare glaze: in a small pot over medium heat, melt butter.  Stir in carob until dissolved and smooth. In a medium bowl, combine this carob mixture, milk, powdered sugar, and vanilla.  Mix until smooth.
9. Spread glaze over peanut butter layer
10. Let set for a few hours and enjoy!

Monday, October 7, 2013

Chicken Pesto Pizza

Summer is wrapping up and that means it was time to prune the basil plants for the last time this year.  I was bummed to learn that my basil won't come back next year.  Temps here don't get too cold, so I thought it might have a chance, but no such luck.  After doing some research, I found that basil won't live in temps under 50 degrees F.  Bummer.  We have predicted lows in the mid 40's this week (yay!), so it was time to remove all the leaves and make some pesto.

I've written about my pesto, and, now that I am looking back, I am embarrassed of the picture of the boxed/store-bought basil!  I will be sure to update that next year. Now that my husband and I have grown basil, I realize how much better it tastes and how expensive store-bought is! I am new to the gardening thing, but I was very impressed and pleased with our basil plants.  They were surprisingly easy to grow and produced a ton of basil.  Anyways.... after pruning all the leaves off my 3 plants, I had 40 cups of basil (yep, not a typo, 40 cups.) (And yes, I did prune them throughout the summer!)  I don't know what all to do with basil, but I love pesto, so I just made a TON of pesto and froze it all in little baggies.  I have no idea if we will be able to eat all of that this winter, but I figured we might as well get started.  I made a chicken pesto pizza that turned out to be delicious!  I have blogged about how much I love pizza in the past, and this is definitely a new favorite for us!  

Chicken Pesto Pizza


Ingredients:
Pizza dough (I made mine in the bread machine- do whatever works for you.. a wheat crust is super good!)
2 chicken breasts, chopped into bite-size pieces
1 Tbsp olive oil
1 tsp minced fresh garlic
1/3 c. pesto 
2 c. shredded Mozzarella cheese
1/2 c. grated Parmesan cheese

Directions
1. Preheat oven to 350 degrees F
2. Roll out/stretch/toss etc. dough onto a pizza pan
2. Spread pesto over dough, leaving a 1/2 inch border for crust
3. Heat skillet, olive oil, and garlic over medium heat.  Add chicken and cook until it is cooked through (no longer pink inside)- about 5 minutes
4. Top pizza with chicken 
5. Spread cheeses over top
6. Bake in preheated oven for 20-22 minutes.

Tuesday, September 24, 2013

Pumpkin White Hot Chocolate

As the years pass, the pumpkin spice latte seems to only gain popularity.  This year, they've added a hashtag, and everyone is all like "Yeah! #PSL!" and I'm all like "Humph." until a few days ago.

The weather is getting a little cooler here- at least in the mornings and evenings, and all it does is make me want to follow the trend and drink a pumpkin spice latte.  Before IC, I was a HUGE coffee drinker, especially in the winter.  When it is cold outside, all I want to do is curl up under a blanket and drink a nice hot cup of coffee.  These days a large mug of herbal mint tea works most days.  However, what I've learned is that some days just demand a warm pumpkiny fall drink.  On one of those days is when this Pumpkin White Hot Chocolate was created.

Pumpkin White Hot Chocolate

(makes 2 large mugs)
4 Tbl Pumpkin
2 C. Milk
1/2 C. white chocolate (chips, chunks, whatever)
A sprinkle of pumpkin pie spice**
milk frother

In a saucepan over medium heat, combine milk, white chocolate, and pumpkin.  Wisk periodically allowing chocolate to melt and ingredients meld together.  Once ingredients are mixed and very warm, pour into 2 mugs.  Using your milk frother, froth the milk until you have several inches of delicious foam.  Sprinkle with pumpkin pie spice at your own risk... Enjoy!!

(Warning- my little milk frother had a little bit of pumpkin in it after frothing this mixture- I soaked it in hot water and soap and was able to pull the little bits of pumpkin out.  As an alternative, you can just froth the milk and pour it on top- however, just know this pumpkin foam is to die for, trust me.)

**So, pumpkin pie spice has cinnamon, nutmeg, ginger, and cloves listed as ingredients.  Cinnamon, nutmeg, and ginger are all on the "foods worth trying" list.  Cloves, however, are a caution ingredient..  Sprinkle at your own risk- if I would have looked up cloves before topping my drink with this spice concoction, I would have just left this out or topped it with a bit of cinnamon, nutmeg, and ginger. However, I didn't.  So. top at your own risk! (all that being said, that tiny bit of sprinkling caused no pain.)

Tuesday, September 3, 2013

Avocado Egg Salad


I am a sucker for any type of cold salad in the summer.  However, most of these salads in their classic form are a complete no-go because of the mayo.  I found inspiration of this recipe on Pinterest, but the recipe contained mayo and many problematic spices. However, since the main ingredients (eggs and avocado) are completely safe, I figured I would play around with it and see what I could do.  I'm happy to report that the results are fantastic- love this served with some crackers, in a pita, or on some homemade bread.  Happy eating!

Avocado Egg Salad
4 hard-boiled eggs
1 avocado
1/3 cup cottage cheese
*1/4 cup plain greek yogurt
*1/4 tsp garlic
*1/4 tsp salt
*1/8 tsp pepper

Remove shells from the eggs and discard.  Mash eggs with a fork until whites and yolks are in pieces and mixed together.  Remove avocado from skin, discard skin and pit.  Mix the avocado into the eggs using a fork.  Add cottage cheese, Greek yogurt, and spices. Mix with the fork until all ingredients are combined. 

Store in fridge for 1 day.. know that on the second day it might appear slightly brown because of the avocados, but it is still fine to eat.  If that weirds you out, make a sandwich for a friend to enjoy with you day of, or just make half or a forth of the recipe.

Notes: Greek yogurt, and yogurt in general is an ingredient that many with IC can tolerate.  It has been fermented (like buttermilk and sour cream) and so some do report that it causes flares.  I know that Fage and Chobanni plain Greek yogurts are fine for me.  The only ingredients they have listed are: grade A pasturized skim milk, live active yogurt cultures L. Bulgaricus and S. Thermophilus.  I recently tried a store brand Greek yogurt that had other ingredients listed, and it caused a flare... So, all things considered, try a small amount, and see if you tolerate this.  If this is a problem food for you, I would just replace the yogurt with more cottage cheese- I bet it would still taste great!
As always, spices (salt, pepper, and garlic) are triggers for some.  Salt and garlic are among the friendlier, and pepper is a "try it" ingredient.  Know your body and your limits; adjust accordingly!

Recipe inspired by Ashley from neverhomemaker.com

Monday, July 29, 2013

Sausage Hash Brown Quiche

Oh my goodness, they make preservative free sausage.  I don't know why it took me a year to find this and try it out.. but its probably for the better.  I know pork in itself can be a bladder irritant, but I figure if I want some sausage this would be the lesser of two evils.  I was so excited about this that I might have cooked the sausage and then ate some plain... As difficult as it was to stop eating plain sausage, I did restrain myself and made something.  (Goodness, I am glad some of you have IC and will feel the same way, because I am sure I sound crazy right now!) I found Jimmy Dean brand sausage at Kroger in the preservative free meat section- this little section is a new addition to my Kroger, and it is next to all the other meat sections.

I decided to make a hash brown/quiche casserole thing.  Sausage, peppers, eggs, and hash browns. There is not much more I could ask for.  Clearly I am in a food coma and blissed out on sausage, so I am just going to move on to the recipe.

Sausage Hash Brown Quiche


Ingredients:
3 C Shredded hash browns (thawed)
1/3 C Butter (melted)
8 Oz Sausage
1 Tbl Butter
1 C Chopped bell peppers (whatever combination of colors you want)
1 C + 1/4 C Shredded Cheddar cheese
4 eggs
1/2 C Milk
Salt & Pepper
Garlic Powder

Steps:
-Preheat oven to 425 degrees
-Spread hash browns in the bottom of a 9-inch pie dish, season with salt, pepper, and garlic powder as desired (remember, a little bit of garlic powder goes a long way!)
-Pour 1/3 C melted butter over potatoes
-Bake in preheated oven for 20-25 minutes or until hash browns start to turn golden
-As hash browns are cooking, brown and crumble sausage.
-Melt 1 Tbl butter in small skillet.  Saute peppers until soft.
-Mix sausage, peppers, and 1 C cheddar cheese in a medium size bowl
-In a small bowl, beat eggs and milk until well mixed (add salt and pepper here too if you desire)
-When hash browns are golden, remove from the oven.  Top with sausage mixture and then with egg mixture. Sprinkle with 1/4 C cheddar cheese on top if desired.
-Cook for another 20 minutes in oven at 425.  Remove from the oven when top is golden and delicious looking.  Let cool for about 5 minutes and serve!

Monday, July 22, 2013

Chicken Bacon Alfredo Pizza

My husband and I eat pizza weekly.  It is a sort of family tradition... My Grams and Gramps eat popcorn, pizza, and watch a movie most every Sunday evening.  I've always found this so charming and special about them- that they weekly took time to have a cheap and fun "date night."  I loved this tradition of theirs, and I always wanted to do something similar to set aside and cherish time with my husband. Our version of the tradition is to set aside a night each week to make a pizza and watch a movie.  My first thought of pizza after getting IC was, "boring." But after some time playing around in the kitchen, I've come to find TONS of IC friendly pizza ideas.

Chicken Bacon Alfredo Pizza is just what it sounds like: not healthy in the least, but so so yummy!  This is one of my favorite pizzas to make because it gets both of us in the kitchen and having fun.  My husband is the bacon fryer and crumbler, and I take care of the chicken, sauce, and dough.  Last night, I twirled and tossed the pizza dough around kitchen trying to imitate all those cool pizza chefs you see on TV (note: I am sure I didn't come close to resembling them, especially since I was already in my PJ's) while he carefully and precisely cooked the bacon to the perfect crispy-ness.  Give this pizza a try.  You will LOVE it.  Its worth all the time and steps, trust me.


Quick Pizza Dough:
1 pkg active dry yeast
1 cup warm water
2 cups bread flour
2 Tbl olive oil
1 tsp salt
2 tsp sugar

Alfredo Sauce:
2 Tbls Butter
1/2 C. Heavy cream
1/2 tsp Garlic (minced)
3/4 C. Parmesan cheese (shredded)
2 Tbl fresh chopped Parsley

Toppings:
1 C. Mozzarella (shredded)
1/4C. parmesan (shredded)
1 cup chopped chicken, cooked (I like to saute mine in butter and garlic!)
6 slices of bacon, cooked and crumbled

Dough:  In a small bowl, dissolve yeast in warm water, let stand until creamy, about 10 minutes.  In a large bowl, combine 2 cups bread flour, olive oil, salt, sugar, and the yeast mixture.  Stir well to combine.  Beat well until a stiff dough has formed.  Cover and let rise until dough is doubled, about 30 minutes.  Preheat oven to 350 degrees.  Turn out dough onto a well floured surface.  Roll out dough into a pizza crust shape.
Sauce: In a small sauce pan over medium heat, melt butter.  Add garlic and cook until golden. Reduce heat to medium-low and stir in heavy cream.  While stirring frequently, cook for 5 minutes.  Whisk in cheese, and continue whisking until it is melted and sauce is creamy.  Stir in parsley. 
Pizza: Pour and spread sauce on top of pizza dough, sprinkle cheese, then add the chicken and bacon. 
Bake in preheated oven for about 22 minutes, or until top is golden and amazing looking.  


Wednesday, June 19, 2013

Roasted Red Pepper "Pimento" Cheese

Summer says vacation, summer says beach, summer says pimento cheese.
  

On my yearly vacation to the beach (before IC) there was always a large container of pimento cheese in the fridge.  You would come in from the beach, take out some bread, snag the pimento cheese, make a sandwich, grab some chips, and head back out to the beach.  Its just what you did, no questions asked.  

Last year's beach trip was right after being diagnosed.  I missed my pimento cheese, but I was in SO much pain that I went without anything that was a risk just to feel better.  This year, I feel like I am journeying through happily living with IC, learning day by day how to make great IC-safe food.  So, here I was at the beach, dying for some pimento cheese.  (Well, not really.  If I would have eaten some of that peppery, seasoned, sharp cheddar, and mayo, I would have been dying.  Thank you, IC. But I digress.)  So, here I was on a beach break at the heat of the day just wanting some of that creamy, cheesy, summery perfection.  And I had it!  The day before I had played in the kitchen for a while and came up with this recipe.  I'm happy to report that it had my screaming, jumping up and down, smiling in excitement and wonder.  It was like seeing a long-lost friend!  (clearly, I am a foodie. Geeze.) Anyways.  I also need to say that my family also loved it.  A winner all around!  

Nothing says southern summer like Pimento Cheese.  Enjoy it on a sandwich, atop a burger, on a cracker, whatever your preference, this version of IC-safe pimento cheese will quench your craving, and, if you are anything like me, it'll make your day.  

4 cups fresh grated mild cheddar cheese
6 oz. cream cheese, softened (make sure to get the blocks, the containers sometimes contain unsafe preservatives)
1/2 cup cottage cheese
*1 roasted red pepper and juice, peeled, seeds removed, chopped 
1/4 tsp garlic powder
**1/4 tsp onion powder
1/4 tsp salt
**1/8 tsp pepper

Combine all ingredients and squish/mix together with your (clean)hands. Refrigerate and enjoy!

* onion powder and pepper are "foods worth trying" on the IC Diet list- they should be fine in this small amount, but know your limits and try a small amount first if you are unsure! 

** Red Peppers are a completely safe food, don't worry the stars are for another reason! This is my method for roasting and preparing them.  I roast my peppers in the oven at 450 for 30 minutes turning them once in the middle of cooking.  Cool them in a paper bag after removing them from the oven- this allows them to steam and the skins to peel off super easily.  Before peeling, poke a little hole in the bottom of the pepper and squeeze it over the bowl to save the juice from the pepper, this keeps the seeds from getting mixed in the juice.  Then peel, remove the seeds, and chop.  This can be a time consuming process but its completely worth it.

Last note, I promise. Pimentos are not listed on the IC-diet list, but being that they are a mild, sweet pepper, they are likely safe.  If you can find fresh pimentos, try them and see how things turn out, I know I will. Unfortunately, my spastic "I want to make pimento cheese" self could not find them at the farmers market at the beach.  However, you might have luck at your local farmers market.  The jarred pimentos that I found all contained citric acid, which my IC cannot handle.  The roasted red peppers make quite an amazing substitute in my opinion, though! 

Saturday, June 8, 2013

"Ritz" Cracker Chicken


One of the biggest challenges I've found with cooking with my IC is making mainly-friendly meals that both kids and grown-ups enjoy. For years everyone in my family loved Ritz Cracker Chicken night. The crumbly, buttery crackers coating a moist piece of chicken- just delicious! After getting IC, this was one of the many meals that I resigned to never make again. That box of Ritz crackers has a crazy amount of ingredients.

However, during one of my weekly grocery store trips, I spotted a box of organic/preservative free crackers in the organic section. They looked just like Ritz crackers, so I bought them to see if they tasted just like Ritz crackers. Turns out they did, and they were gone within 24 hours.. waaay before I got around to cooking with them, Oops! But I bought them again and made this chicken for dinner the same night.

This recipe is a family pleaser. I made it for my younger siblings who are 10 and 12 and my cousin who is 5 when they all came over to hang out and sleep over at our house. I love living close to family, but sometimes it's challenging to feed them things I can enjoy too, especially when they are kids! However, this was a hit. There wasn't a bit left in the pan! As you can probably see from the picture, I served mine with homemade focaccia bread and black-eyed peas. The peas were of course not a favorite for the kiddos, but the benefit of being a cousin/sister is that I don't have to promote complete healthiness, and I get to always serve ice cream for dessert.

One warning: these crackers do have soy emulsifier as one of the incidents. Soy can be an irritant for IBS which is commonly an issue for us with IC. Personally, I can tolerate small amounts of soy once or twice a week. Just be aware of this if its a concern for you!

Ingredients:
1 pkg Boneless, skinless chicken breasts
1/4 cup butter, melted
1/2 pkg Late July Organic Buttery Crackers (or another imitation ic-friendly Ritz-like cracker
Butter to coat baking dish

1. Heat oven to 350 degrease
2. Coat baking dish with butter
3. Crush Crackers by putting them in a ziplock and mashing them until no large pieces remain- kids LOVE helping with this step!
4. Cut fat off chicken. Dip in butter, then in crushed crackers, and place in baking dish
5. Pour remaining butter evenly over chicken and sprinkle with mailing crackers
6. Bake at 350 for 30 minutes or until chicken is cooked through

Monday, May 27, 2013

Green Smoothie


One of my most missed treats are smoothies. Because many fruits are high in acid, smoothies tend to be a caution on the IC diet. I stumbled upon a green smoothie on Pinterest one day, and I was intrigued. Unfortunately the recipe was disappointing, because it included fruits not on the IC-Diet.

Well, the interest was planted, and I decided to give smoothies a try. It took a few times, but this is one of my favorite combinations of ingredients. The banana is definitely the strongest flavor, and I don't even taste the spinach or avocado. The liquid component of the smoothie is water given that pretty much all juices are a no-go. My favorite thing about this particular smoothie is the creamy-ness that it has because of the avocado. This is a very generously sized smoothie; it keeps me full for hours! You could definitely serve it as a snack for 2-3 people if wanted. 

Do be aware that bananas are a caution on the IC-Diet list because of the high potassium content. However, I tolerate them just fine assuming that my diet is good, and I don't go overboard. If you haven't tried them, try a small bit first and see how things go for you!

Ingredients:
1 banana
1 pear
1 avocado
1 cup spinach, packed
1 cup water
1/2 cup ice

Combine all ingredients in a blender and blend until smooth!

Pesto


You've probably heard it before, but pesto is an IC staple. Some of my favorite ways to enjoy it is on pasta, as pizza sauce, combined with cream cheese for a dip/spread, and simply as a way to add a punch of flavor to any dish.

What I love about pesto is that it has a nice bold punch of flavor, yet is completely IC-safe. This is a rarity, and I love that it is something to safely enjoy in a variety of ways.

The recipe makes quite a bit of pesto- around 1 and a half cups.  I usually make it and use it to top pasta for dinner that evening. I then freeze the remaining pesto in 1/4 - 1/2 cup batches as this is what I usually need for any recipe. 

Ingredients:
3 cups fresh basil leaves, packed
1tsp minced garlic
1/2 cup grated Parmesan cheese (fresh seems to be safest for me, but I've heard other people say that they prefer the canned)
1/2 cup olive oil
1/4 cup pine nuts
1/2 cup fresh parsley

1. Spread pine nuts on a cookies sheet and place in the oven at 375 degrees until golden, about 5-10 minutes. Make sure to stir them at least once during the cooking process to ensure that they don't get too brown on one side.
2. Combine all ingredients in a blender or food processor and blend until smooth!

Thursday, April 25, 2013

Hummus: The Greatest Staple Ever

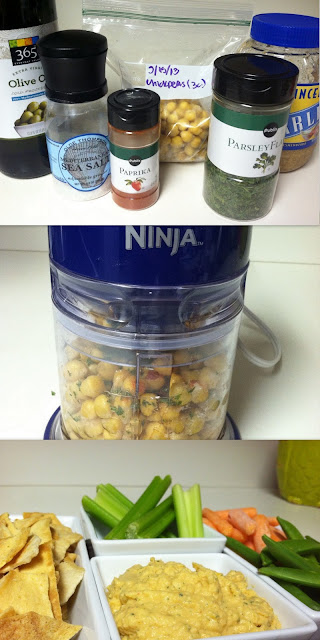
Before getting IC, I would buy hummus at the store occasionally, and I enjoyed it. After getting IC, I realized how awesome this stuff really is!  There are tons of recipes on the internet with different hummus recipes.  I recommend you go check them out... with a few changes, the different varieties of hummus can keep our taste buds entertained and satiated.

This post contains my favorite basic hummus recipe.  While I like to change things up and add different things now and again, this is my favorite go to.. its quick to make and stores in the fridge just fine for a few weeks. I also love it because I can serve it as an appetizer at a family get-to-gather or a party with friends and everyone enjoys it!

Classic Hummus

2 cups chickpeas/garbanzos (preferably fresh, but canned is okay too)
1-2 Tbl tahini (not pictured!)
1 1/2 Tbl olive oil
1 Tsp garlic
1 tsp parsley flakes
1/4-1/2 tsp salt
3-5 Tbp water (start with 3 and add more water if hummus is too thick)

Put all ingredients into a food processor and mix until creamy!

FYI- tahini is ground sesame seeds. It adds a bitter flavor to hummus. I sometimes include it, and sometimes leave it out all together just depending on how I am feeling. Try including it and leaving it out and decide your preference!

Thursday, April 18, 2013

Blocked


I have a blogging block.  Everything in life feels ridiculously heavy right now.  My IC keeps flaring despite having a solid diet.  Darn stress.  The truth resonating in me is that God is good.  Despite hard times, despite disaster, bombings, abuse, disease, whatever the mountain, He is always near, and He is always good.    

Psalm 63:1-5
“O God, you are my God, earnestly I seek you;
My soul thirsts for you, my body longs for you,
In a dry and weary land where there is no water.

I have seen you in the sanctuary and beheld your power and your glory.
Because your love is better than life, my lips will glorify you.
I will praise you as long as I live, and in your name I will life up my hands.
My soul will be satisfied as with the richest of foods; with singing lips my mouth will praise you.”

Blogging feels insignificant.  It feels meaningless and silly.  There are SO many blogs, SO many recipes… I am blind to my purpose here and lost in the seemingly unessential nature of just another blog.  

Monday, April 1, 2013

Cooking the Perfect Chickpeas/Garbanzos


So I've got to be honest here... I am by no means an expert at cooking chickpeas/garbanzo beans.  There are tons of awesome blogs out there with perfect pictures and tons of details.  If you want to want to know the science, look at gorgeous pictures of a bean, or read a comparison of different cooking methods, then go to Google and find just that.  No hard feelings; no bitterness.  This blog is simply my awful pictures and my preferred method of cooking garbanzos.  (I know my enthusiasm for my own blog just compels you to read on!)

Before having IC, I never would have thought about or taken the time to cook chickpeas.  The only way I consumed chickpeas was in store-bought hummus.  IC put a stop to the store bought hummus (yay, citric acid!), and I started to experiment with making my own.  My first batch of hummus used canned chickpeas.  They work just fine, but trust me, they are nothing compared to fresh cooked.  So, one day when I had some time, I tried cooking dried garbanzos.  I will never go back.

I want to share this method of cooking chickpeas/garbanzos, because I use them in tons of my recipes.  They are the backbone of amazing hummus; they are delicious to snack on, and they are an awesome way to add protein to a salad.  All that being said, enjoy my photos, glance through the directions, and finally, give it a try.  Honestly, I think its really difficult to mess up a batch of these babies.


Ingredients:
Chickpeas/Garbanzo Beans (for the record, they are the same thing)
Water

Method:
Rinse chickpeas in cold water.  Place all chickpeas in a container or large bowl, with plenty of water covering.  You want the bowl/container to be large, and there to be about 3 inches of water above the beans.  Cover and stick in the fridge overnight to soak.
Take beans out of the fridge and dump into a strainer.  Once all of the excess water is drained, place beans in a large pot taking time to check that there are no green/discolored beans.  Cover the chickpeas with at least 3 inches of water and bring to a boil over medium heat.  As the beans heat up, you will likely hear popping coming from the beans- this is okay, don't freak. Bring the water to a boil.  At this point, there will likely be lots of foam in the pot- scoop this out with a large spoon.  Reduce the heat to medium-low.  You want there to be a bit of a simmer, but not boiling.
Cook the beans for an additional 2-3 hours.  Taste test after 2 hours to see how they taste.  Are they too crunchy for your liking?  Let them cook a little longer.  If a good amount of the water evaporates during cooking, then add more water- just make sure it is hot! (Experts probably recommend against this, but I've done it more than once, and the beans still wind up delicious.) Once the beans are cooked to your liking, remove from heat, drain and enjoy! I've found that the chickpeas will keep in the refrigerator for 2+ weeks without a problem.

Notes:
I often cook a ton of chickpeas at once- I just never seem to be home long enough to remember to soak them all night and then have time the next day to cook them.  So, when I do remember to make time to cook these, I cook a ton just to make my life easy.  I then freeze 3 cup batches in freezer baggies.  Each batch allows me to make hummus and have some leftover to throw on salads and pop in my mouth as a quick snack!


Monday, March 25, 2013

Where to Go from Here

I have had some hesitancy in writing recently because I am not sure of the direction I want to take with this blog.  My main intention was to share with other ICers some yummy things that I have found to eat.  I have always loved cooking and baking, and being diagnosed with IC was a serious shock to this love.  I am SO thankful that I love playing around in the kitchen.  If I didn't, I would be seriously frustrated with IC by this point.  It gets boring eating cottage cheese, plain chicken, oatmeal, vegetables, plain pasta, rice, etc. I've been diagnosed with IC for almost a year now, and that year has provided lots of fun yummy eats, but also many awful bland or icky failures in the kitchen.  My main plan in this blog is for it to be a place to share the yummy things.

However, over the past month or so, I have been wondering what else to share here.  Do people want to hear from many ICers? Should I "feature" an ICer every few weeks who could share their story with IC as well as some of their favorite foods and flare-fighting tactics?  Should I talk more about the current research about IC?  Should I talk deeply about my journey through IC- the good and the bad- like figuring out sex, the struggles of being in school with IC, should I run here on my painful/bad days, or should I keep this more as a building-up happy place?  

I've also had a little bit of hesitancy because so many recipes I make and post are simply things that I have found online and have adapted.  This seems like cheating in a sense- like I am not giving you something 100% original.  I know many bloggers share things like this and just post it as their own. I don't want to do this though- I want the original creator of the recipe, or at least the place I found it, to be given credit.  In the future, I plan on posting things from cookbooks and other blogs- I am just needing to take time and reach out to these authors.  Blogging, cooking, photographing, and sharing recipes takes a lot of time and I don't ever want to take this from another person! I guess for me, this is a place where you can come to find a lot of IC-safe recipes.  They might be completely original, or they might be adapted/copied and linked from another place on the web.  My intention is to show you a recipe that I have found delICious; its something that I've taken the time to make, adapt, eat, and share with others, something that I have tested and made that has been a scrumptious success.  

So this is where I am.  I have not (until now) advertised this blog, because I am scared!  I am, by no stretch of the imagination, an expert at IC.  I am just another person who was diagnosed with it, another person who's world was turned upside down by this condition.  I just also happen to have a love for writing and a love for reaching out to others who are frustrated and hurting.  

Today I am reaching out.  I am going to make an attempt at sharing this blog.  If you are here, I am guessing you heard that attempt- thank you!  Leave some comments and tell me what you want to hear.  I am hopeful that you ICers will have a voice and help me figure out what direction to take with this blog.  

And just so you know- my slow blogging hasn't been because of a lack of recipes or ideas.  I have been cooking up a storm in the kitchen!  I have many meals, side dishes, snacks, and desserts that I have made and photographed- they are all just waiting to be shared!  Yummy goodness like my favorite hummus recipe (what a staple!), a mouth-watering and super filling smoothie, "hamburger helper", blueberry scones, blondies, snickerdoodle muffins, oatmeal raisin cookies, homemade amazing rolls, and pesto, just to name a few.  I also have about 234534 recipes on my queue to make and adapt for us.  There is a lot to come here, and I am excited you are joining me for the journey!

Thanks for reading!

-Kristina

Monday, February 25, 2013

Honey Pork Chops

Today I am sharing one of my most favorite easy, quick, ingredients-always-on-hand dinners.  Let me fist confess my saying that I am typically not a fan of pork chops.  I don't know what it is about them, but this meat was never one I went to for any meal.  Unfortunately, or maybe fortunately, my husband LOVES pork chops.  I stumbled across this recipe about a year ago now, and thought I would give it a try.  I think it was the honey and brown sugar along with the desire to make my hubby a IC-approved dinner that he would love that made this one happen.  The original recipe is on allrecipes, but I've changed the amounts of a few things.  Find the original here, and my preferred method is below.  Whether you are a pork chop lover or not, you've got to love a dinner that requires all easy and on-hand ingredients.  I like to serve these with a homemade bread and a vegetable for a well-rounded yummy meal.


Ingredients:
4 boneless pork chops
Salt
Ground black pepper
4 Tbls packed brown sugar
4 Tbls Honey

1. Heat oven to 350 degrees F.
2. Sprinkle pork chops with salt and pepper on both sides.  Heat skillet over medium heat.  Add pork chops and cook until brown, turning once.  Place in 9x13 baking dish.
3. Combine brown sugar and honey in a small bowl.  Microwave for 20 seconds, and stir to combine.
4. Spoon half of honey mixture evenly over-top pork chops
5. Bake for 15 minutes in preheated oven.
6. Remove from oven, flip chops, and spread with remaining honey mixture.
7. Bake for another 15 minutes.
8. Serve making sure to spoon some of the extra drippings over top your chops!


Thursday, February 21, 2013

Being Rejected

Sorry for my absence. I have been mad at my IC, and I have (sadly) taken it out on the blog.

I recently received an e-mail and packet in the mail because I was a match for a leukemia patient needing a bone marrow transplant.  I was ecstatic   I have known people whose lives have been saved because of a transplant.  To know that I was a match was something special; it was a way for me to help someone.

I'll make the short story shorter: after filling out a brief health form, I was rejected because I have IC.  In their words, because of the unknown cause of interstitial cystitis as well as the lack of formal research, I could not be allowed to donate.  This rejection hurt more than I would have ever imagined.  I know having IC means that I can't eat normally.  I know having IC means intimacy is a pain it shouldn't be. I know that having IC means change after change in my daily lifestyle.  I did not know that having IC meant that I couldn't be a donor.  I did not know that IC meant that I couldn't save a life.  

Receiving the phone call was like someone looking at me and saying, "You are not healthy, and you are not enough."  Now the logical, smart part of myself knows that this is malarkey.  I am enough, and I try daily to be healthy- my healthy is just different than other people's.  

This experience has taught me a lot about having IC as well as what it means to help.  As a friend said, "It (IC) may be preventing you from this one opportunity, but there are SO MANY ways you can still serve people and ways that you'll be BETTER at serving people because of it"  I'm happy to say that after a week I can see that her words are incredibly true.  Having IC does not keep me from mentoring my sweet friend at a local elementary school.  Having IC does not keep me from counseling people through unexpected pregnancies.  Having IC does not keep me from serving my husband, loving my family, or being a devoted friend.  Having IC gives me perspective; it gives me an understanding of what struggling to be healthy feels like.  It gives me an understanding of having a condition that can't be seen.  It gives me an understanding of invisible pain.  It gives me an understanding that can help others struggling through similar situations.

So I leave you with this thought: IC, or any condition, can only limit you as much as you let it.  Sure there are bad days, days that are very hard to get through, but they are only days.  Recognize the condition, eat right, make smart choices, reduce stress, and most importantly live the life you were given.  Rock it and live it well, because you were placed on this Earth for a reason.  If you don't live your life, no one else will.   

Friday, February 1, 2013

Pesto Grilled Cheese


Pesto is one of my favorite ic-friendly sauces.  I have it on pasta and pizza often, but last night I decided to try it on a grilled cheese.  I'm happy to report that it was delicious.  What is better than gooey melted cheese, a bold punch of pesto, and bread that is soft on the inside and buttery crunchy goodness on the outside? Not much.  The sandwich was enough by itself for my dinner, but the hubs had some canned soup with his.  All-in-all, this is something I will be making again soon!

Recipe makes 2 sandwiches

4 slices white bread 
butter
1/4 cup pesto
3 slices white american cheese
3 slices cheddar cheese
4 Tbl Parmesan cheese 

1. Heat skillet to medium heat
2. Spread butter over one side of bread.  Place butter side down in the pan.  Spread pesto, top with 1/2 of cheeses, spread more pesto, top with another slice of bread, spread top of sandwich with butter.
3. Cook until toasty, flip sandwich and cook until that side is toasty.  
4. Repeat for the other sandwich and enjoy!

Monday, January 28, 2013

Buttermilk Biscuits

Breakfast is a great meal to enjoy with IC.  So many of the ingredients are IC-friendly to start.  With the addition of newer all-natural foods like this bacon, which is preservative free, naturally wood smoked, uncured, no added MSG, gluten free, and delicious, breakfast gets even better. This is a completely "friendly" food, so enjoy it! 


There is, of course, the option of going to a butcher for bacon like this, or Trader Joes might sell some for cheaper.  However, I find great joy in being able to walk into a normal grocery store and find all the fixings for one meal. 

So after finding this bacon, I thought that breakfast for dinner sounded just about perfect.  I served the bacon, scrambled eggs, and some delicious buttermilk biscuits.  I also had some homemade crockpot apple butter... didn't even miss the jam!  Don't worry, I'll be sharing the recipe for that apple butter soon!

I do want to caution this recipe... buttermilk is listed as a "food worth trying cautiously" ingredient.  When buttermilk is made, there is a build up of lactic acid which is what gives it the sour taste.  I was able to enjoy it without a problem, but you might want to try a small amount first before going hog wild. (Get it? with all the bacon talk earlier, I couldn't resist.)

Anyways, onto the recipe!  

Buttermilk Biscuits


4 cups self-rising flour
1 Tbls white sugar
1 Tbls baking powder
2/3 cups shortening
2 cups buttermilk

1. Preheat oven to 400 degrees.

2. In a large mixing bowl, combine flour, sugar, and baking powder; stir until well mixed.  Cut in shortening until shortening is broken up... the mixture should look well mixed and pea-sized lumps only remain. Add 2 cups buttermilk and mix just to moisten.

3. Roll out dough to 1-inch thickness and cut into biscuits. Place biscuits on baking sheets.

4. Bake in preheated oven for 15 minutes, or until golden.

The original recipe said it yields 18 biscuits.  I got closer to 14... Perhaps I could have rolled the dough out a bit more, but in my opinion, the biscuits were perfect.


Saturday, January 26, 2013

Granola Bars

One of my most favorite snacks are granola bars.  Before IC, I would often eat popular brands like Special K, Natures Own, or Kashi.  Since getting IC, I have tried several different store bought granola bars with not so great results. Brands like Kashi and Luna which boast of all natural/organic ingredients still bothered my IC- even if the ingredients didn't list anything that seemed problematic.  I tried Larabars, but couldn't get past the taste, so I don't really know if they triggered a flare... But whatever the case, after trying different granola bars, I decided that maybe store bought was not the way to go.  That's when I started searching online for different granola bar recipes.   I stumbled upon this recipe for Playgroup Granola Bars, and figured I would give it a try.  These granola bars are amazing.  I almost always have some stored away in my pantry to enjoy throughout the week.  Another great thing about this recipe is the quantity.  I get about 16 generously sized granola bars from each batch.  They also freeze perfectly.  Click on the link for the original recipe.  Below is my preferred way to enjoy them.


2 C. oats (I use instant because that is what I always have on hand)
1/2 C. brown sugar
1/2 C. wheat germ
3/4 tsp. ground cinnamon
1/2 C. wheat flour
1/2 C. all-purpose flour
3/4 cup raisins or white chocolate chips
3/4 tsp salt
1/2 C. canola oil
1/2 C. honey
1 egg, beaten

2 tsp vanilla extract


1. Preheat the oven to 350 degrees F (175 degrees C). Generously grease a 9x13 inch baking pan.

2. In a large bowl, mix together the oats, brown sugar, wheat germ, cinnamon, flour, raisins and salt. Make a well in the center, and pour in the oil, honey, egg, and vanilla. Mix well using your hands. Pat the mixture evenly into the prepared pan.

3. Bake for 25-30 minutes in the preheated oven, until the bars begin to turn golden at the edges. Cool for 5 minutes, then cut into bars while still warm. Do not allow the bars to cool completely before cutting, or they will be too hard to cut.


Thursday, January 24, 2013

A Little About Me

The most logical place to start is the beginning... I was diagnosed with IC in April of 2012 after two months of "UTI"s and severe stomach pains.  I consider myself lucky that I only suffered for two months without a diagnosis. When I started having pain, I went to my general practitioner who diagnosed me with a UTI and possible bladder infection.  After treatment for this and no resolution, my stomach pain was increasing, and he believed that I may have had an STI/STD.  Knowing myself and knowing that an STI/D was not the answer to my pain, I decided to stop seeking his services.  I thought the next best place to go was to a gynecologist.  I was very lucky in that my GYN diagnosed my condition in one visit.  She said, "I think this may be IC, here is a diet to do.  I want to see you in 2 weeks to do a potassium sensitivity test to diagnose for sure." So I went on the diet for the 2 weeks, and noticed great improvement.  The test was painful and definitely not something that I would ever sign up for again, but it was the result my doctor needed.  I was put on Elmiron for treatment and Uribel for pain and sent on my way with the intention of following up with her in 3 months.

Unfortunately for my IC, I moved about a month and a half later.  Finding my next doctor was awful.  I started at a GYN hoping that I would have a similar experience: false.  I went to a urogynecologist at Emory who wanted to schedule a cystocopy and hydrodestention... This is another test that is done to test for IC, but it is an invasive surgical procedure.  I was extremely iffy about going through with this procedure given that I was positive that I have IC and at this point was seeking treatment.  It then took the office over a month to schedule the procedure, despite the fact that they were receiving a phone call a week from me. Given their rudeness and inability to call a patient back, I decided to find another doctor.  I went to ic-network.com, a fantastic website for family, friends, and sufferers of IC, and discovered that there was a recommended doctor somewhat close to me.  I decided the 45 minute drive was well worth good treatment. 

While diet and Elmiron have been a great help, I have not been progressing and feeling great like I would hope.  Over time my doctor has adjusted my medications, and I am currently taking Elmiron, Uribel, a small daily dose of Elavil, an antihistamine, and rescue installations.  This combination of treatments has been wonderful, and I am finally having days where I don't experience pain from my IC.

My biggest battle currently with my IC is pelvic floor dysfunction.  To put it short, my pelvic floor muscles don't contract/relax like they should, or like a normal person's does.  There are many daily activities that are very painful and resultantly painful for days.  I have been seeing a physical therapist with the hopes to better train my pelvic floor muscles. 

Now that you know my story, I want to tell you about why I decided to start this blog. I have loved cooking for as long as I can remember.  Growing up, I loved helping my mom in the kitchen with dinner.  After being diagnosed with IC, my whole cooking style had to change.  I bought some cookbooks for cooking with IC, but I was quite disappointed.  I have had success with some recipes.  However, most of the recipes seemed very fancy and the ingredients seemed obnoxious.. beets, leeks, and carrots for tomato sauce.. seriously?! (for the record, I did try it, it was awful, and I'll save the details for a later time.)  I found that I had the most success when I took my old favorites and made them IC friendly. So now that I am baking my own bread, making my own pesto, enjoying some preservative free granola bars, making sauces out of fresh roasted red peppers, and whipping out meatloaf that my husband has thirds of, I have decided I need to share my kitchen adventures.  The best thing about you being a reader is that I'll only share the yummy ones, and I'll spare you from the disasters. 

Thanks for visiting and I look forward to sharing some delICiousness with you soon!